|
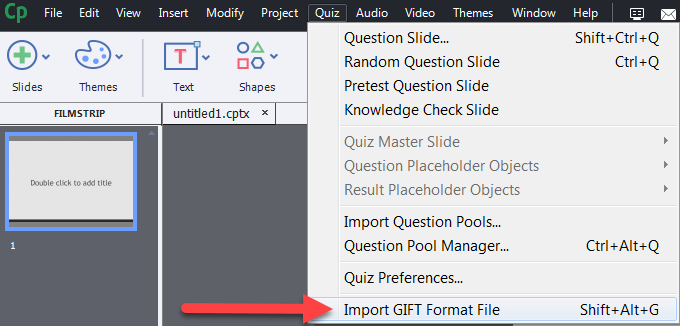
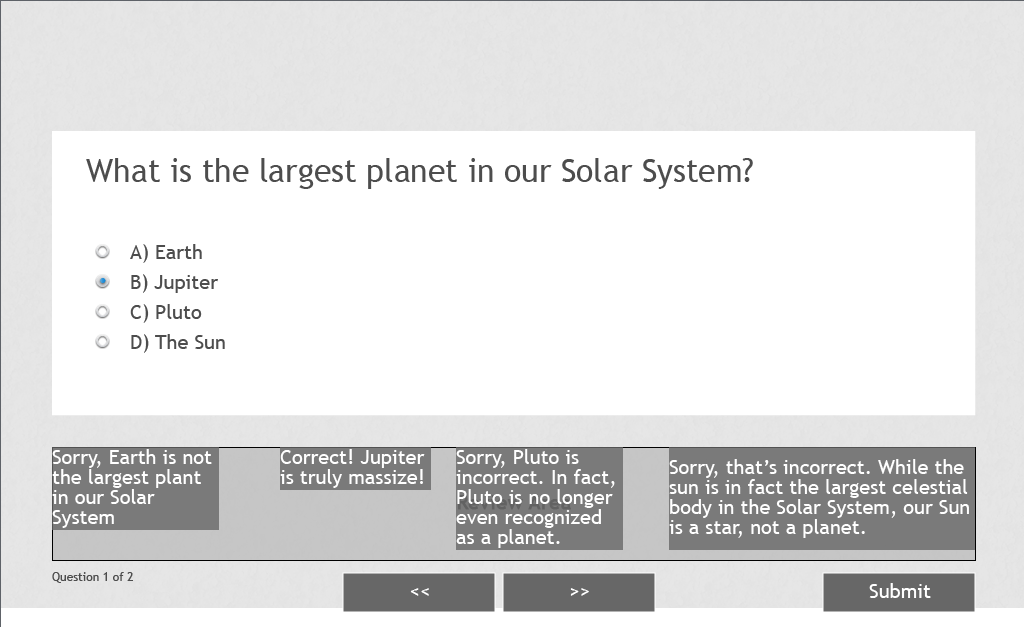
Hello, everyone! With the holiday's officially upon us, and the countdown to Christmas underway (at least in my house!), I thought now would be the perfect time to talk about a special little surprise found in Captivate. And quite fittingly enough, it's called GIFT, or General Import Format Technology to be precise. But me? I'm sticking with GIFT. That said, let's take a quick look at the words that define the acronym to get a better understanding for what it can do for your eLearning project. GENERAL - Think of this word as 'Universal', meaning it is generally recognizable by most programs. IMPORT - A great techie word that means I can bring something pre-existing into my project. FORMAT - Like formatting you've done in Microsoft Word, except less alignment and more symbols. TECHNOLOGY - Electronic. Hmm, maybe they just needed another word because GIF was taken? In a nutshell, GIFT formatting allows for the incredibly simple addition of quiz questions into your project. Yes, simpler than what you may be thinking! (NOTE: While this blog pairs GIFT formatting to Captivate, it is by no means the only program with which GIFT can be used; some learning management systems allow the use of the GIFT formatting as well.) So, how does it differ from the typical quiz layout you've likely seen hundreds of times? To answer that, let's take a look at what some GIFT-formatted questions look like. MULTIPLE CHOICE EXAMPLE What is the largest planet in our Solar System?{ ~Earth#Sorry, Earth is not the largest plant in our Solar System =Jupiter#Correct! Jupiter is truly massive! ~Pluto#Sorry, Pluto is incorrect. In fact, Pluto is no longer even recognized as a planet. ~The Sun#Sorry, that’s incorrect. While the sun is in fact the largest celestial body in the Solar System, our Sun is a star, not a planet.} TRUE/FALSE EXAMPLE Jupiter is the largest planet in our Solar System.{TRUE#Wrong, that's incorrect.#Right, well done!} MULTIPLE ANSWER What are the two largest planets in our Solar System? ~Earth#Sorry, Earth is not one of the two largest planets in our Solar System. %50%Jupiter#Good job! Jupiter is the largest planet in our Solar System. ~Mars#Sorry, Mars is not one of the two largest planets in our solar System. %50%Saturn#Good job! Saturn is the second largest planet in our Solar System.} As you can see, GIFT-formatted quizzes rely on symbols, like the equal sign (=) to identify correct answers, the tilde (~) to mark incorrect answers, the percent sign (%) to note partial credit, and the pound sign (# ...yes, that is a pound sign folks) that precedes unique feedback for each answer choice. What you don't see, are question numbers, lettered answer choices, and feedback appearing on a different lines than the answer choice. So now that we know what GIFT Formatting is, let's see what Captivate can do with a file formatted in this fashion.
From personal experience in the pain-staking process of writing quizzes over and over multiple times, the GIFT Import feature will certainly save you time, and most likely frustration to boot. To learn more about GIFT formatting, click HERE. Until next time folks, go BE the YOND!
2 Comments
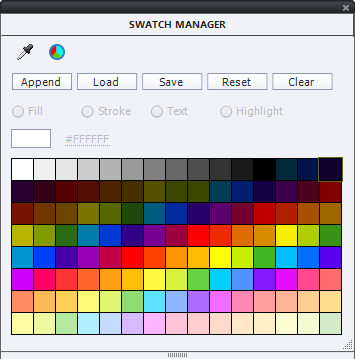
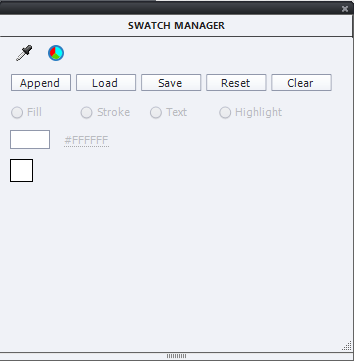
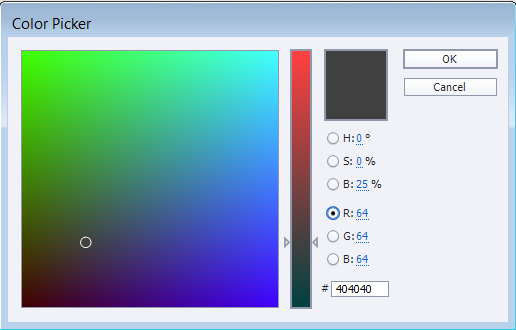
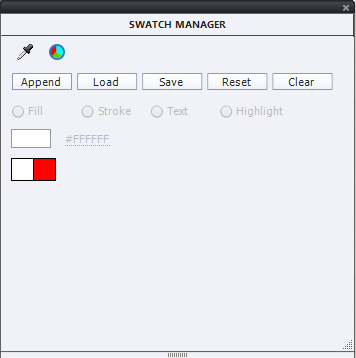
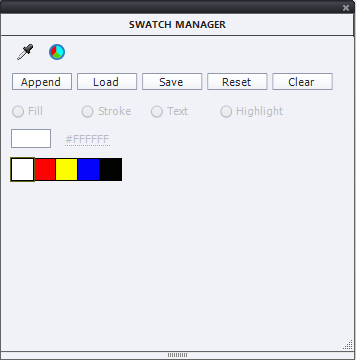
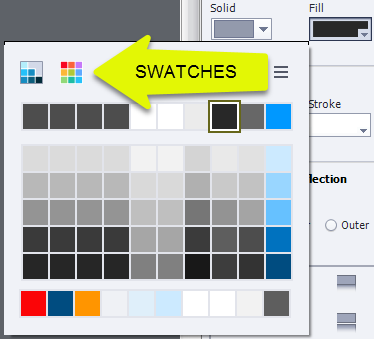
Hello, all! I recently realized that when creating a project in Captivate, it can be rather burdensome to find just the right colors to match your full brand spectrum. Thankfully, Adobe Captivate has you covered! Follow these simple steps to customize the built-in Swatch Manager, and make the default palette walk the plank! 1. Open a Captivate project file. 2. From the top menu bar, select Window, and scroll down to Swatch Manager. The default should look like this. 3. From the Swatch Manager viewing pane, click on Clear. 4. Click ‘OK’ in the subsequent warning box that appears (Don’t worry, your project itself won’t lose any colors, only the Swatch Manager color selector will be affected). Swatch Manager should now look this. 5. Next, click the small color wheel icon in the top left corner of the Swatch Manager to begin customizing the palette (you could also use the eye dropper icon to do this, but this tutorial will use the color wheel). See image below. 6. For this tutorial, I’ll be making a Primary Colors palette, but feel free to choose any colors you like from this point forward. 7. Select a color and click ‘OK’. 8. You will be prompted to give the swatch a name (NOTE: This name applies to that single color only, not the entire palette we are creating). So for my example, I’ll name this one ‘Primary Red’. Click ‘OK’ and you should see something similar to the image below. 9. Repeat steps 7 and 8 until you have added all of your custom colors. Once complete, move on to the next step. 10. When all is said and done, your Swatch Manager should look the image below (I like to have black and white bookends around my custom colors because it’s incredibly rare to not find a need for their use in a project). 11. Click ‘Save’ and give this palette a distinctive name (For mine? You guessed it…PrimaryColors), and save it in a location you won’t have trouble remembering in the future – I keep all of mine in a folder called, ‘Cp Custom Palettes’. 12. To check your work, click on any shape in the open Captivate file. 13. From the Properties panel click Fill and choose the Swatches icon marked in the image below to begin using your newly customized color swatches! 14. Finally, give yourself a nice pat on the back. You are now a Captivate Swatch-buckler!
NOTE: You will need to load the saved file into each new project you open (see the ‘Load’ button in the above images). Also, I like housing these saved palette files in my project assets folder for efficient future use. If you are looking for something a bit more permanent, however, stay tuned for my blog on customizing Captivate themes which have a considerably broader reach! Pro Tip: The file extension, .ase, stands for Adobe Swatch Exchange, and is compatible with other Adobe products. So what are you waiting for? Import away! Until next time folks, "Go be the yond!" Adam Hello, all. One day, a few months back, I was watching an episode of Brain Games on NatGeo. For those who are unaware of the show, in a nutshell, it’s a ‘sciencey’ show that focuses on how the human brain works. This episode, called Motion Commotion (click HERE to watch the episode), had a piece devoted to motion-based optical illusions where a static image appeared to be shifting, rotating, oscillating, etc. due entirely to how the brain interpreted the visual information it was given.
Another example from the show focused on what the makers of Brain Games refer to as Swimmers (essentially, the illusion of fish-like shapes swimming through water). In this illusion, only the background was moving…the fish-like objects were 100% stationary…yet, it appeared as though the fish were the objects not just moving (right to left), but SWIMMING! That is, right to left, with a bit of bobbing up and down. After watching the episode, I really started thinking how this ‘tricking of the brain’ could be applied to my eLearning content development process. So, I decided to develop two identical slides in Captivate 9, modeling the Swimmers illusion. Here’s what I found: In the first, -I randomly placed nearly 2-dozen fish-like objects on the stage. -I then added swimming animations to each of them separately (motion path right to left and custom path up and down) – I realize I could have duplicated 1 fish and 1 animation to save time, but the goal of this resides elsewhere. -I filled them with a solid green fill -I filled the slide background a bluish, (watery) color. -The whole process took me just under 2 hours. In the second, starting from scratch, -I randomly placed the same number of fish-like objects -But this time, I filled them with a vertical gradient (green and brown) -And this time I added a large rectangle to act as the background. I filled it, too, with a gradient, but a horizontal one instead (6 gradients spanning two blue colors…light, dark, light, dark, light, dark with equal spacing) -I gave the blue background shape a simple left to right motion path, and voila! Swimming fish! -This one took me just over 40 minutes to complete. Reducing my time by roughly two-thirds! The key here, is the use of contrasting gradients that led to the illusion of motion (just as the episode said!). While the graphics themselves are rather basic, the goal of this blog is to opening your mind to the consideration of strategically leveraging the power of a learner's brain during the development process in order to aid in the learning process. Check out the end result by clicking on my demo, floaters_demo.mp4 (To add to the illusion, one could even incorporate sound, as I have in my full version, or a background with an underwater scene). I hope this has been helpful, and I hope you, like me, will continue to think in terms of saving time while developing content by using the power of the brain to fill in the blanks! Until next time, shoot for the stars and BE the YOND! Adam Today, I'd like to talk about the importance of storyboards and the impact they play on the development of eLearning content. And given the day, storyboards can be analogous to going to battle, for, say, one country's independence. Now, let me be clear: In no way am I equating e-content storyboards to battle. That said, this analogy resides in the outer fringes of the battle; long before a single musket ever bellowed "Glory!" into the air. Imagine, if you will, what could have happened if General Washington and his faithful men, crossed the Delaware without having a clear plan of action, tactical strategy, or, dare I say, storyboard for battle? Many have said that success resides in preparation. And whether it be mental, physical, or technological, a storyboard should be at the top of your e-content preparation checklist. And as we head back into the trenches on the fifth, pay a nod of gratitude to those who gave their lives for our freedom, and tackle your next battle with a storyboard. Download my storyboard template for free by clicking the PowerPoint file below! Happy Fourth, everyone, and until next time, shoot for the stars and BE the YOND!
|
|||||||

 RSS Feed
